Sign up for Greenhouse Gases - a weekly-ish newsletter that will teach you the science behind regenerative gardening, with action steps to help you make a difference in your backyard.
Winter Squash is one of my favorite crops to grow. Without much effort, they will provide food for you all winter long. After a simple curing process, winter squash will store for you for 8 months or more.
It’s no wonder winter squash was a staple crop of Indigenous Americans. From the Iroquois of New York State down to South America, winter squash has been a staple food for millennia.
While winter squash is a breeze to store, there are some tips and tricks you should know to get abundant yields.
Many of these tips involve regenerative gardening practices. This means that as you’re growing winter storage food, you’re also growing carbon storage too.
I’ll share my techniques for planting winter squash from seed to harvest, and break down the steps in this guide.
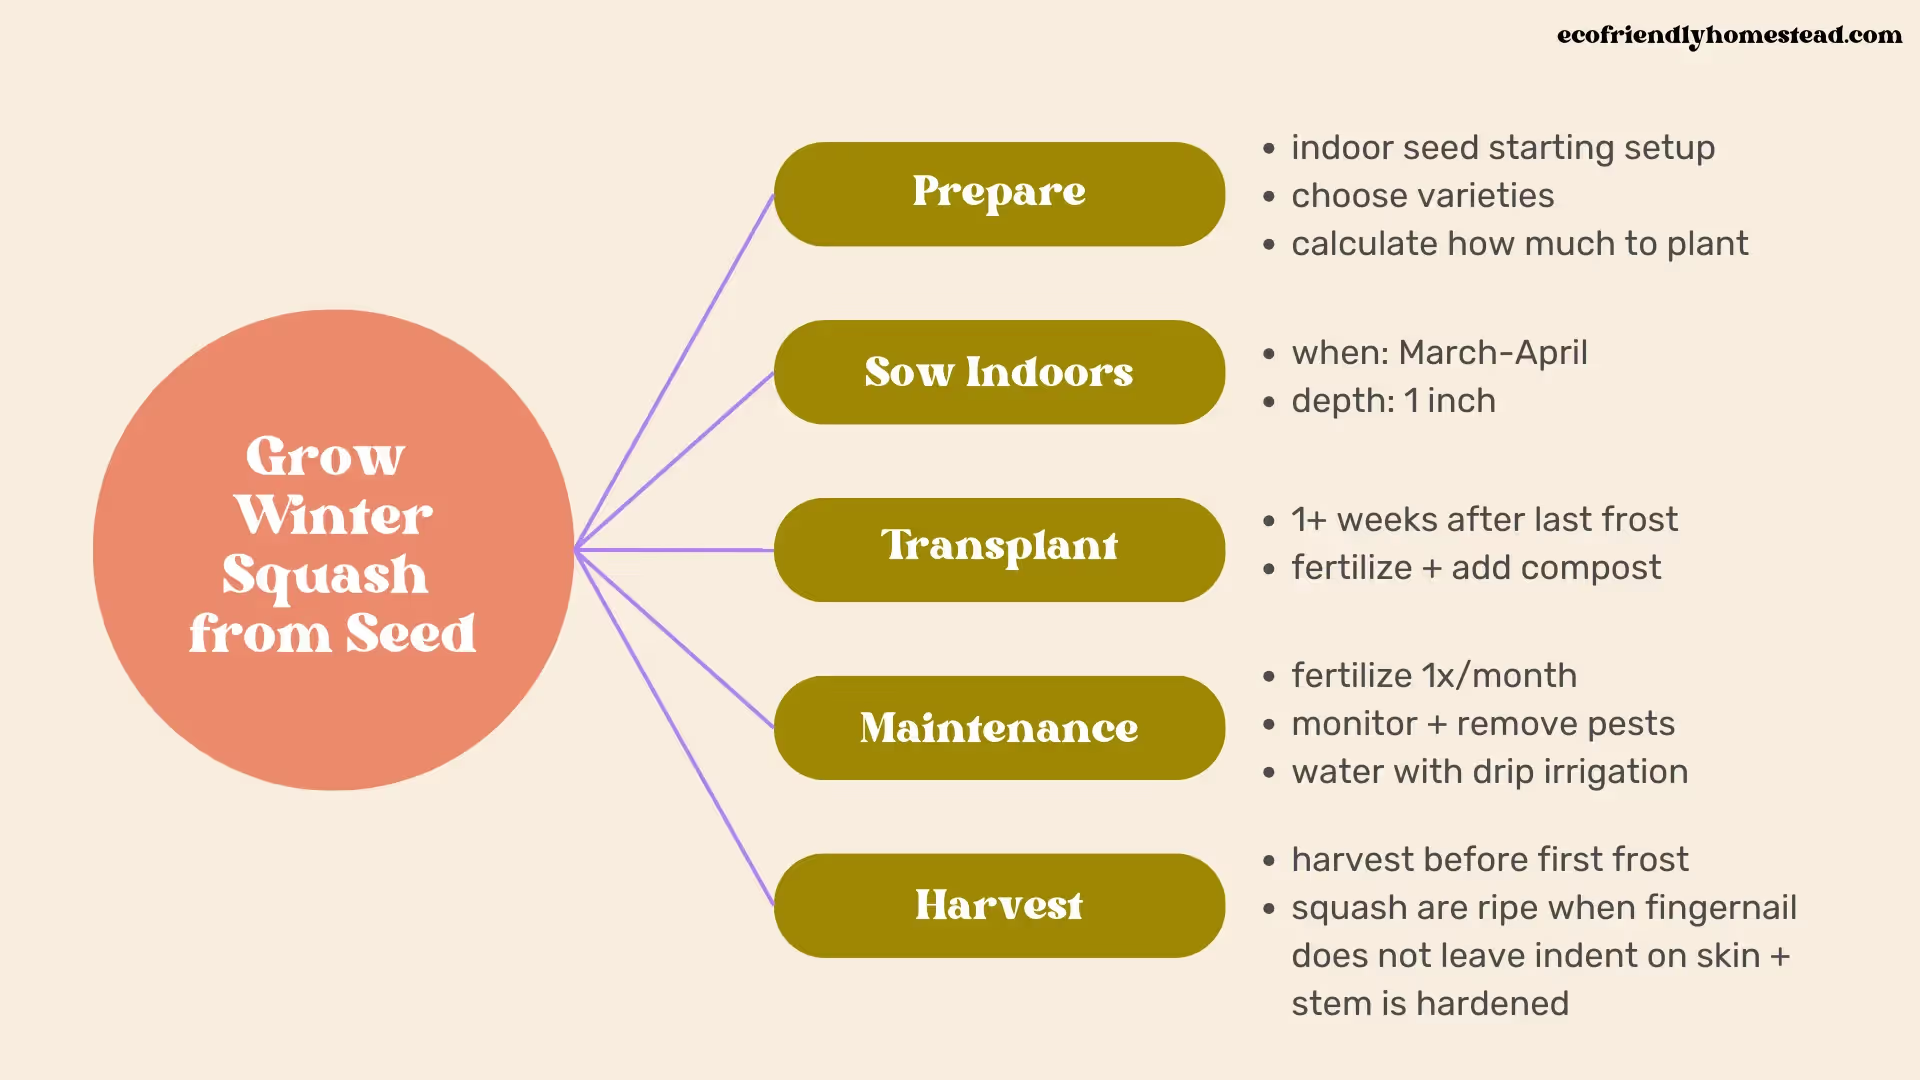
When to plant winter squash seeds by zone
How to plant winter squash: depth, spacing, and best practices
How many winter squash plants you can grow in the space that you have
Best practices for growing winter squash in containers
When to tell if winter squash are ready for harvest
Where to source winter squash seeds
How regenerative gardening practices will improve your squash yield
→ TL;DR: How to grow winter squash When to plant winter squash? Start winter squash seedlings indoors 1 month before your last frost date. Direct sow or transplant 1+ weeks after your last frost date. Squash like warm soil and weather. However, they have a long growing season of 80-110 days, depending on variety.
How to plant winter squash? Sow seeds 1 inch deep. In your garden, make sure winter squash plants are at least 2 feet apart.
When to harvest winter squash? Winter squash are ready to harvest when the skin is not damaged by a fingernail and when the stem starts to harden and shift color.
Grow Winter Squash from Seed: Sowing Guide
How to grow winter squash in your garden: a full guide
In shorter summer growing seasons, zone 7 and under, I recommend starting winter squash seeds indoors in late March or April to get a head start on the growing season.
Since many winter squash seeds take over 100 days to mature, this will help you to get an abundant harvest.
In zone 8 and above, you may wish to wait until after your last frost to direct sow squash seeds outside.
Whichever method works best for you, make sure that all of your supplies are ready, clean, and available.
If you’re starting seeds indoors, you’ll need:
Grow lights (I use LED shop lights and they work great!)
If you’re starting seeds outdoors undercover, you’ll need:
Table (optional)
Seed starting trays, lids, and drip trays
Seed starting soil (if you can, organic)
If you’re starting seeds outdoors after frost and direct sowing, you’ll need:
A long growing season 🙂 (or fast maturing varieties)
Healthy Broken Down Compost
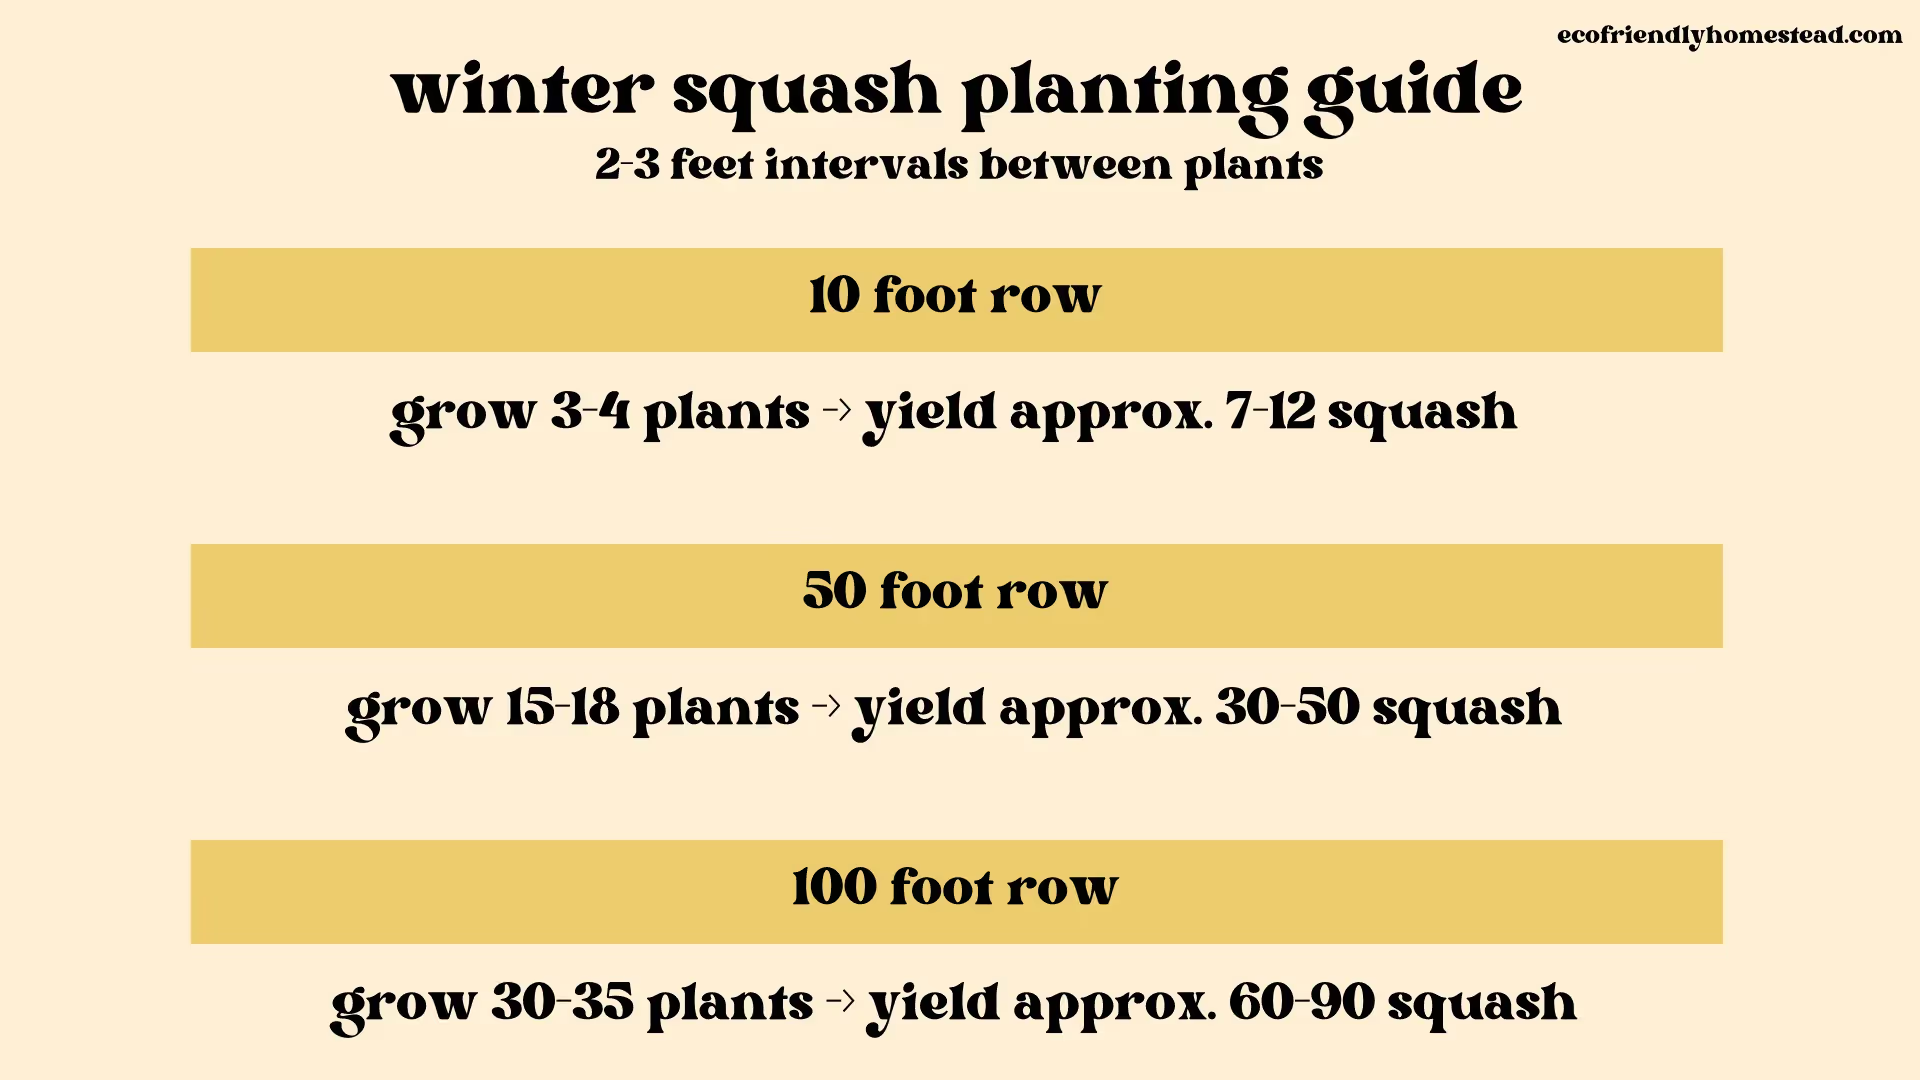
Calculate how many squash you’d like to harvest, or how many you can fit in the space that you have
→ Rule of Thumb: Each squash plant will grow around 1-6 fruits, depending on the variety. Typically larger varieties lean towards 2-3 fruits per plant, and smaller varieties lean towards 4+ fruits per plant.
This past year I harvested over 100 winter squash, and grew around 40 plants from seed to get that yield.
Amount of winter squash to plant for any length of row:
how far apart to plant winter squash
I tend to plant squash a little closer together than recommended. With added compost and organic amendments, I don’t see much of a decrease in fruit size or harvest amount.
Experiment and see what works best for your soil and the plants you choose to grow.
I plant delicata squash around 1 foot apart since it yields a smaller fruit. I plant larger squash varieties around 1.5-2.5 feet apart.
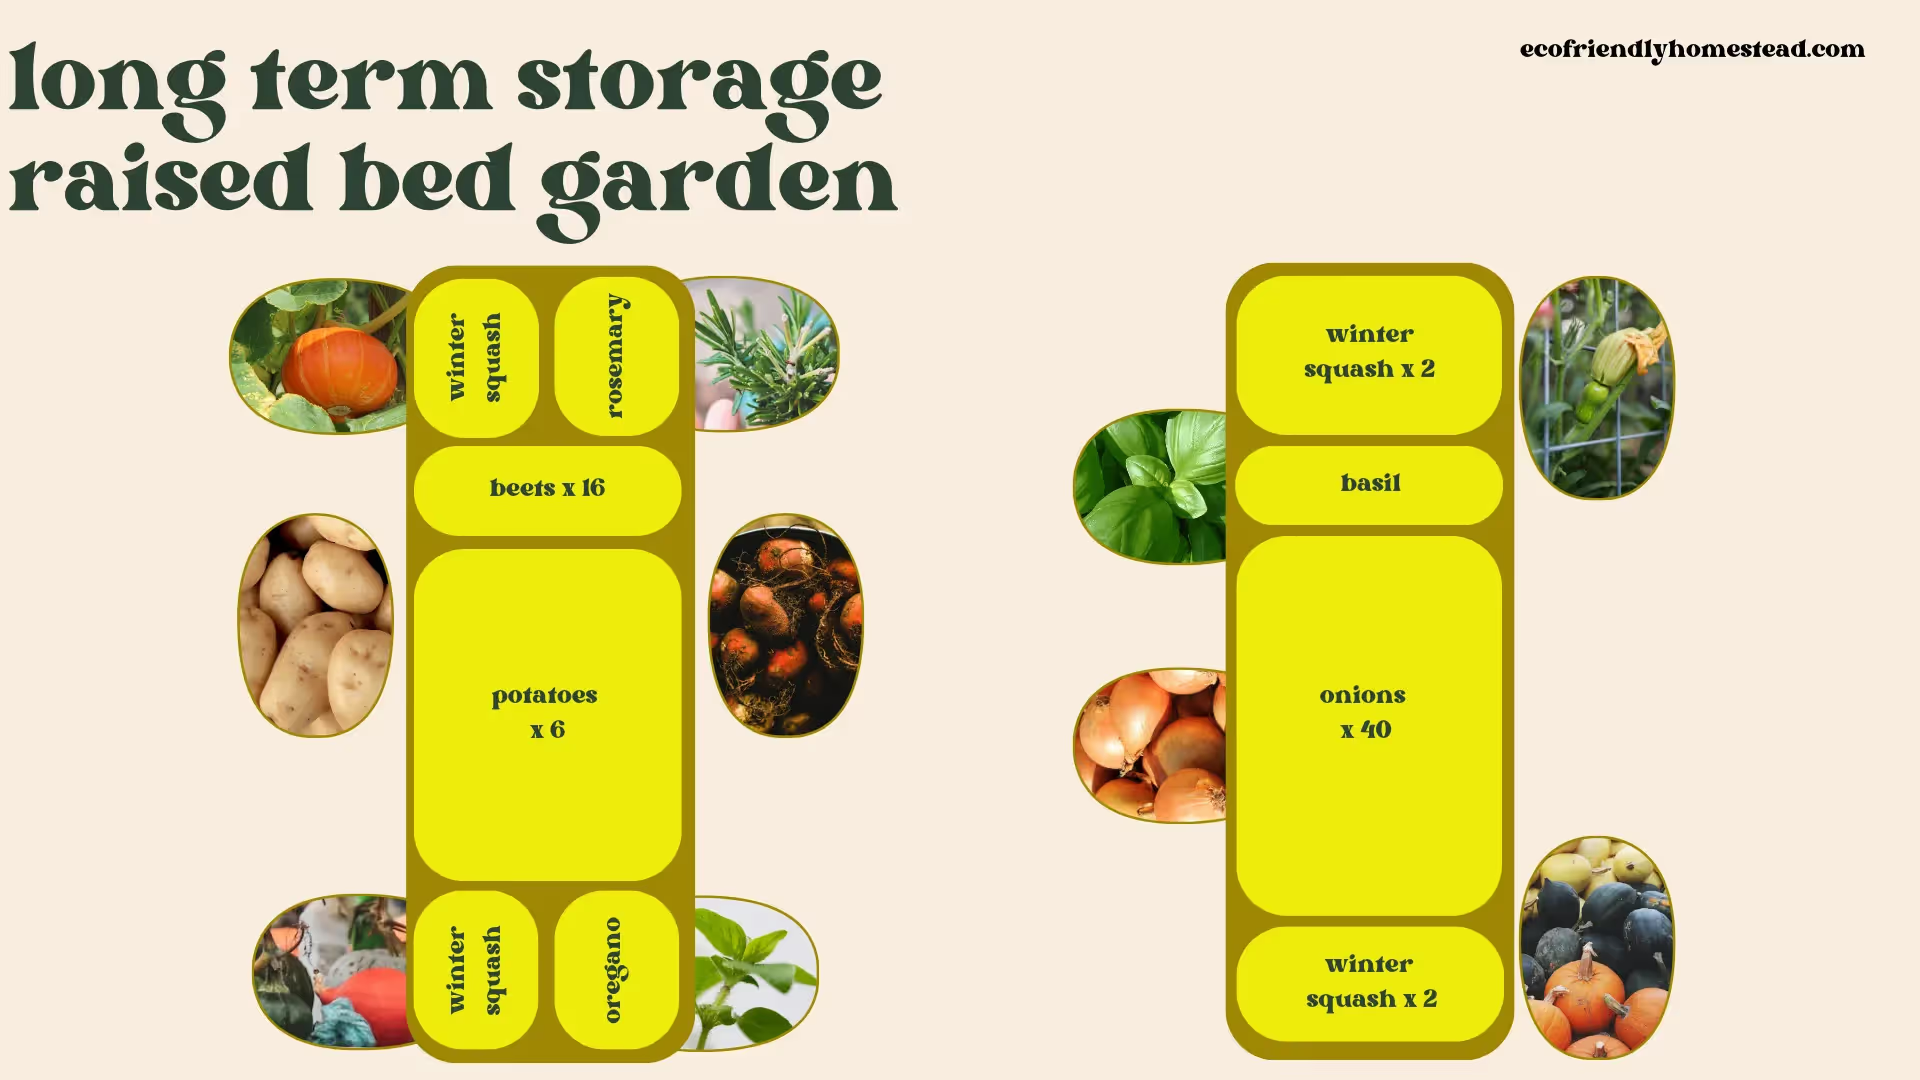
Another technique with squash involves to maximizing your garden space with edge planting.
Place squash seedlings on the edges of raised beds or rows where the plants can sprawl into pathways.
For example, if you have a raised bed that is 4 feet wide, you can plant two winter squash on one end. Then, plant the rest of the bed with other crops.
a raised bed garden plan for winter squash and other long-term storage vegetables
March-April: Sow your Winter Squash Seeds Indoors
→ Personal Experience: When I start winter squash seeds indoors, I always start a few more than I’ll actually need. If my goal is to plant 15 squash plants, I’ll start 20. In this way I have backups if any of the plants don’t germinate or something happens to them in the field.
Tips for if you’re starting winter squash seeds indoors:
Choose air pruning seed trays, like the Epic 4 cells. Soil blocking also works well for me. In this way, roots are not disturbed at transplant time.
Bury the seeds twice as deep as the seeds are long. I usually plant one seed per cell as winter squash germinate easily.
Keep the humidity domes on the seed trays until germination. Once seeds have sprouted, remove the humidity domes.
Run a small fan on the seedlings lightly a for short periods of time daily. This will prevent legginess and disease.
Bottom water your seedlings to prevent disease issues.
Aim to transplant your winter squash seedlings out into the garden by the time they are 6 inches tall.
You’ll need to check your local weather around the time of the average last frost for your growing zone to know when to plant your squash seedlings out into your garden. The last frost date for your garden will vary from year to year, so it’s hard to be specific.
Winter Squash really do thrive in warm soil, so it’s best to wait a week or two (or more, if you can) after your last frost to ensure that cold weather doesn’t stunt your plants.
Zone 2: Plant out around June 1, favor quick-maturing varieties
Zone 3: Plant out around May 25, favor quick-maturing varieties
Zone 4: Plant out around May 20
Zone 5: Plant out around May 15 or later
Zone 6: Plant out around April 30 or later
Zone 7: Plant out around April 15 or later
Zone 8: Plant out around April 10 or later
Zone 9: Plant out around March 15 or later
Zone 10: Plant out around March 15 or later
Steps for transplanting your winter squash seedlings
Carefully remove the squash seedling from its tray. Bury it about an inch below its lowest leaves.
Fertilize: In the planting hole, add in a good quality balanced organic fertilizer. You may wish to add compost as well.
Optional mycorrhizal inoculant: Add in a mycorrhizal inoculant. Squash form beneficial relationships with mycorrhizal fungi. This can be especially helpful if you have dry summers or infertile soil.
Spacing: Space transplants at least 2 feet apart. Larger spacings are great for areas with dry summers. Delicata and other small varieties can be spaced a little less.
Water in: Water your transplant in well. Be sure not to get the leaves wet. Use drip irrigation or water at soil level.
Mulch your seedlings: Winter squash leaves do form a mulch for the soil as it grows. however, seedlings benefit from mulch when they are young.
Hold water for a few days: A recommendation that I follow from Huw Richards is to hold off on watering my transplants after the initial watering. For winter squash, I wait 4 days before their second watering.
Then, water at regular intervals: In my climate, winter squash seem to thrive on drip irrigation 2 times per week. I will water extra during extreme heat if necessary.
Monthly fertilizing schedule: Winter squash are heavy feeders and benefit from monthly additions of fertilizer, plant tea, or compost.
How to direct sow winter squash:
If you live in an area with a longer growing season, you can direct sow your squash seeds.
Timing: You’ll need to wait until all chance of frost has passed. Reference the transplant dates above for when to sow your winter squash seeds.
Sowing: Sow your winter squash seeds around 1 inch deep in the ground, at least 2 feet apart. Keep the area well watered until germination occurs. Mulch between the seeds if the soil is bare with weed-free grass clippings.
Watering: After germination, water only through drip irrigation or at the surface level. Overhead watering can cause issues like powdery mildew. Water your plants at regular intervals 2-3 times a week.
Mulch: Mulch lightly around your seedlings once they sprout. Weed-free non-sprayed dried grass clippings work well for this. The darker color of the grass will help keep the soil warm and moist.
Fertilize: As the squash start to grow, feed them monthly with a balanced organic fertilizer. You may also wish to add in a mycorrhizal inoculant for larger fruit production.
How to grow winter squash in containers:
For the most part, the guidelines for sowing and transplanting squash also apply to container growing.
Here’s some guidance on how many plants to grow in your containers:
15-20 gallons where diameter is around 20”: 1 plant per container
35 gallon grow bags where diameter is around 25”: You can plant 2 squash plants.
60 gallon grow bags where the diameter is around 35”: You can plant 3 squash plants in a triangular formation
July-September: Winter Squash Maintenance
A butternut squash in the early stages of growth in my garden
Continue to water your plants at regular intervals with extra water during times of extreme heat.
Add organic fertilizer or plant food to your plants once per month.
Enjoy the visual delight of the yellow flowers and look for bees!
Monitor plants for signs of pest pressure and foliar disease.
October: Winter Squash Harvest
Tip→ When are winter squash ready to harvest? Look for these two signs to tell if your winter squash is mature:
The top of the stem is hardening up and turning either a darker shade of green (delicata) or brown (most other varieties)
When you lightly scratch the surface of the squash with your fingernail, no mark is left on the skin
When you harvest your squash, be sure to leave as long of a stem as possible. Do not carry the squash by the stem when moving them around.
The stem will harden and protect the fruit from rot. If the stem falls off of any squash, eat them first.
Can winter squash finish ripening inside?
Yes! If you’re going to have a frost before the two qualifications for harvest are met, you want to bring the squash inside. Squash are very susceptible to frost damage.
When you harvest the squash and they are not yet ripe, be sure to leave as much of the stem as possible attached, even a leaf or two. The energy in the stem and leaves will help the squash to continue to mature inside.
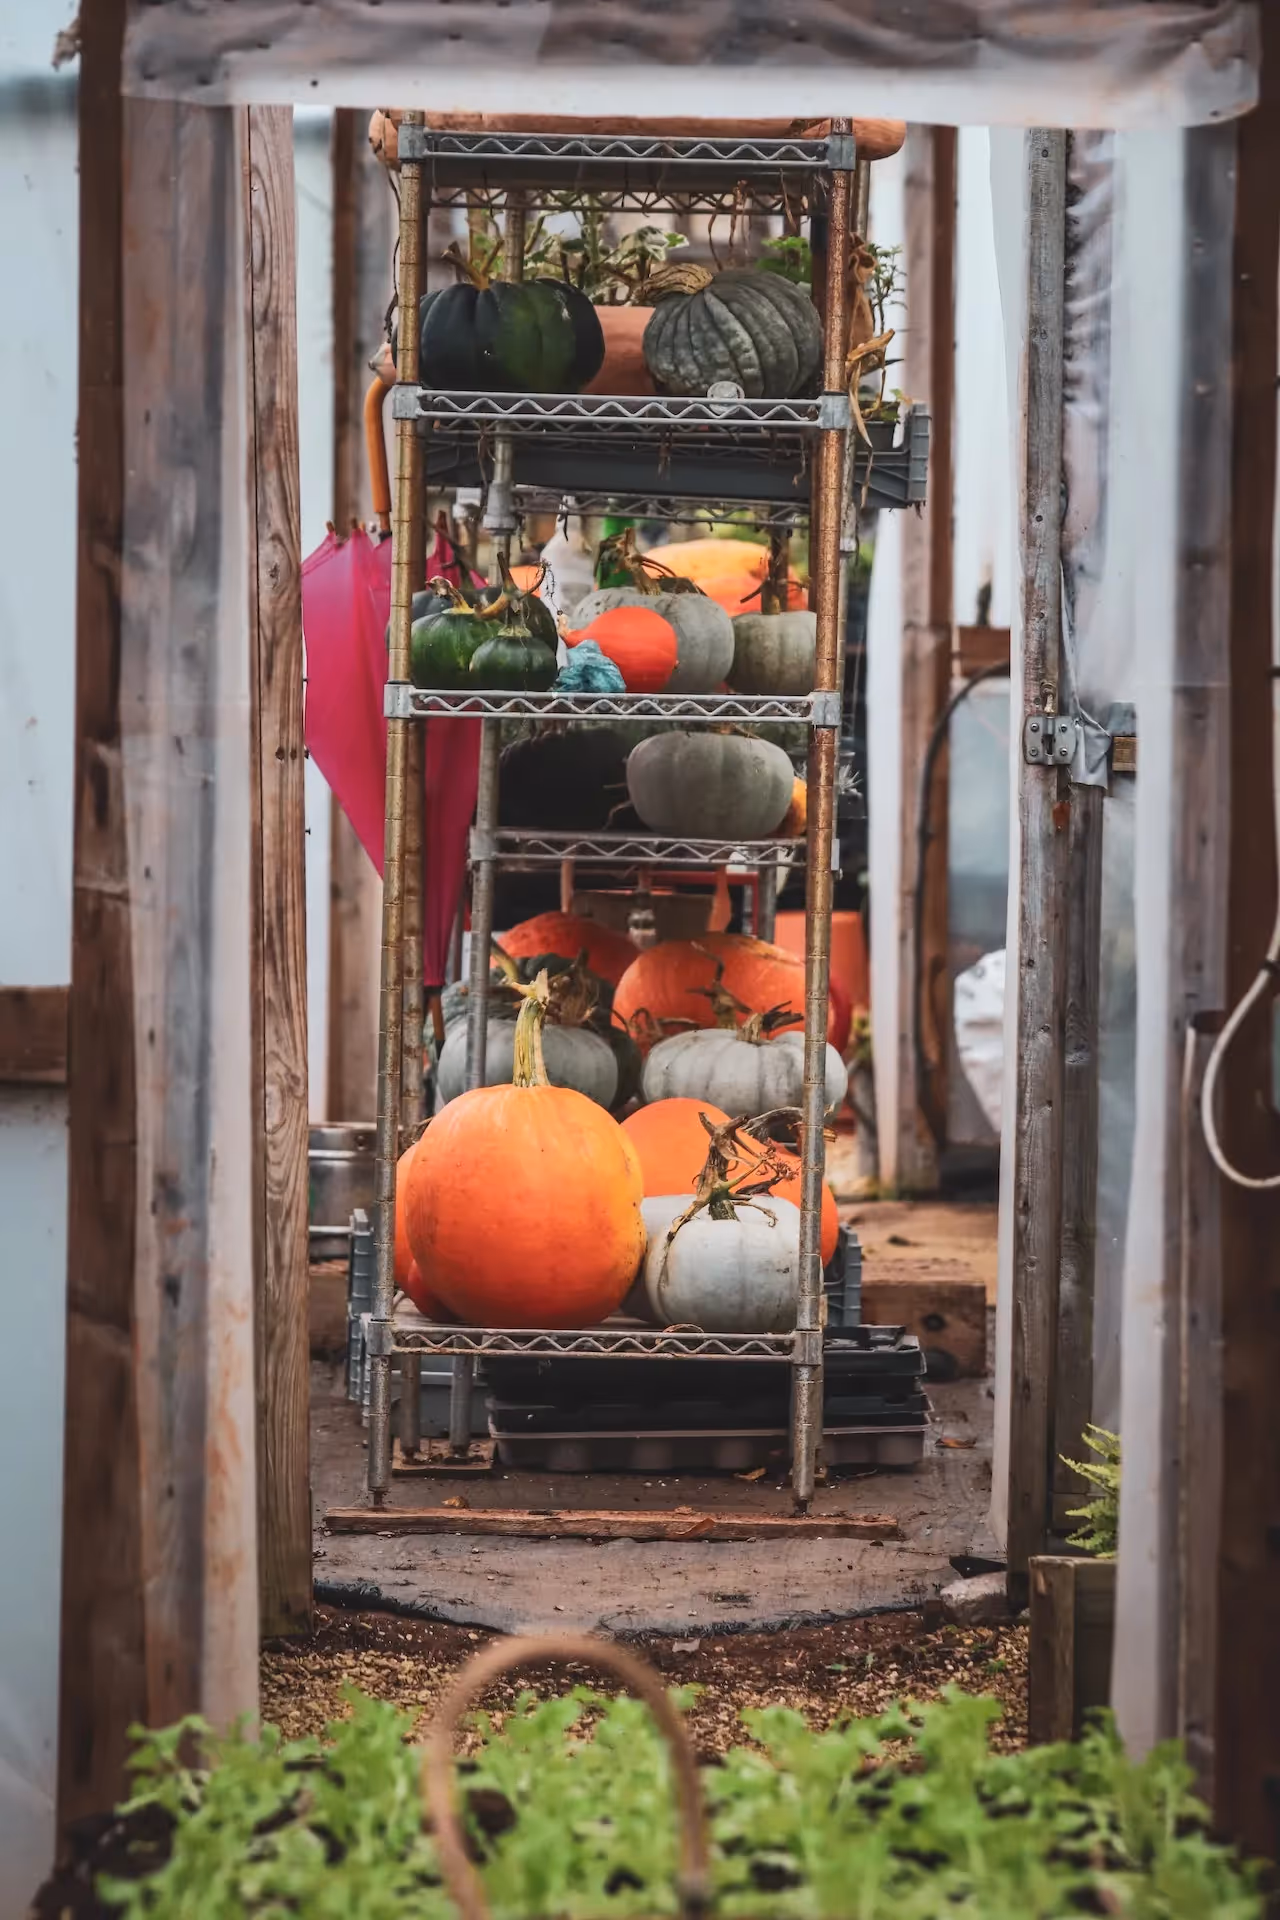
How to cure your winter squash
Curing winter squash in a greenhouse
Curing winter squash is simple. Even in “imperfect” conditions, I’ve had luck curing my winter squash.
When squash are cured in this kind of environment, they “settle,” so to speak. Their skin thickens and they become less likely to rot during the winter months in storage.
However, I have been curing my squash indoors on racks with good ventilation but little sunlight exposure. The squash keep with great success.
The temperature in my house during curing time is usually 50-60 degrees. I imagine if the wood stove is running that the air leans towards dry instead of humid.
In my experience, ventilation and dry conditions matter most. So don’t worry if you can’t check off the other factors when you cure squash.
October-November: Clean Up and Cover Crop
If your winter squash leaves are healthy, trim the plant back to the base. Leave the remainder of the plant to compost in place, or bring it to your compost pile. Leave the roots behind in the ground.
Once your rows are cleaned up, plant a cover crop to nourish the soil during the winter months.
This study from the Rodale Institute shows that a cover crop of Hairy Vetch can reduce the intensity of powdery mildew in future crops. Even if you were lucky enough not to get PM, Hairy Vetch is still a great choice for a post-squash cover crop.
Another study out of Iowa noted that winter squash yield increased when planted after a Hairy Vetch cover crop.
Regenerative gardening techniques for growing winter squash from seed
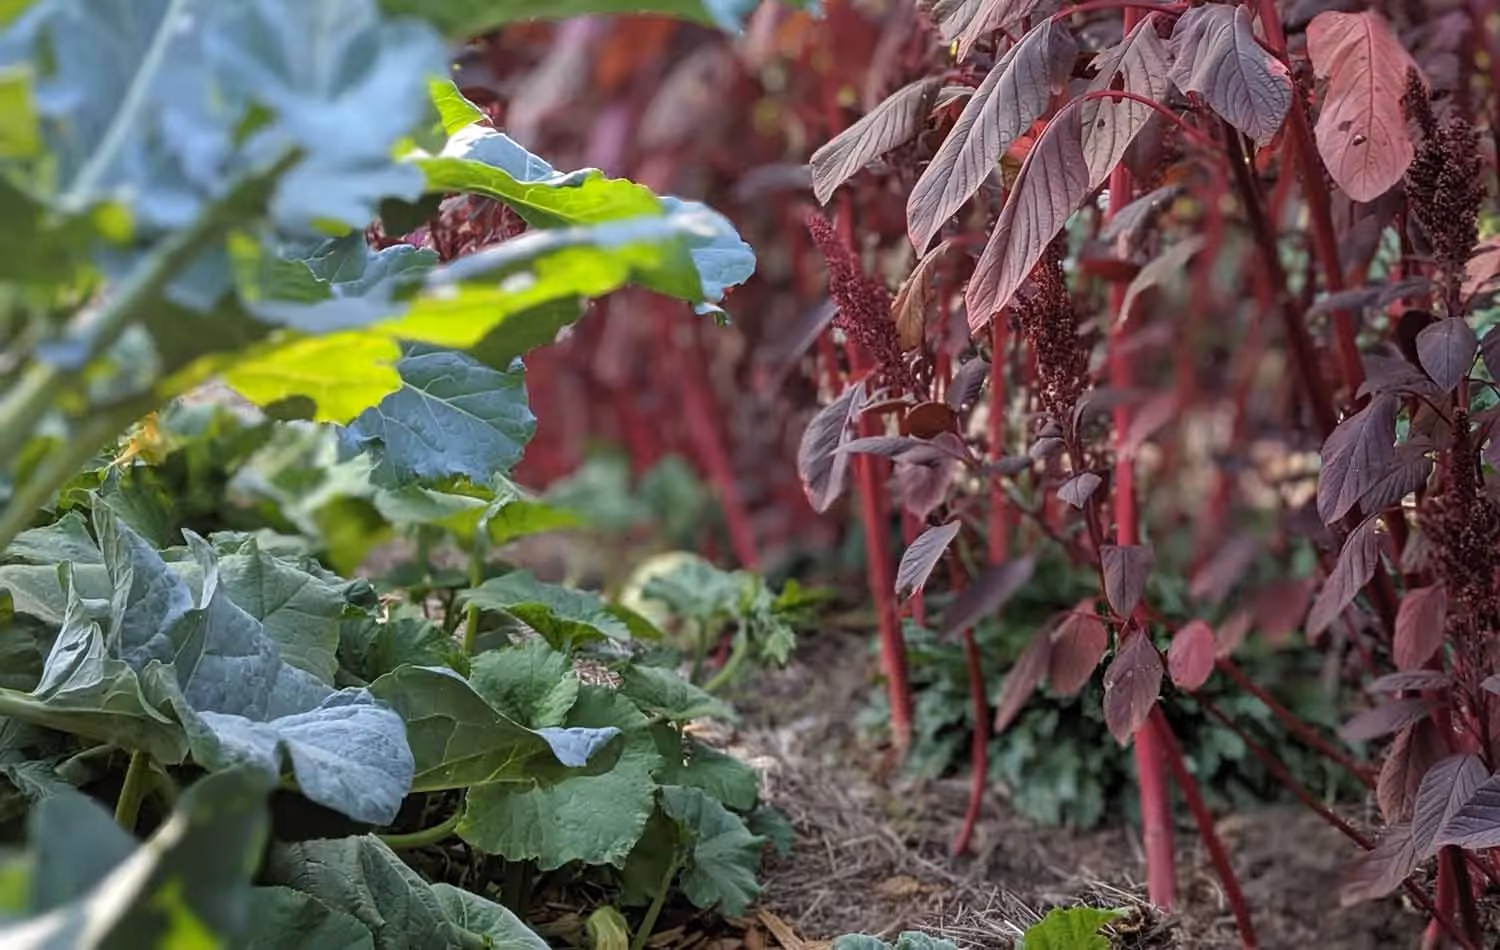
Interplanting/Companion Planting with Winter Squash
In my garden I like to interplant herbs, like chamomile, with winter squash
Some larger varieties of squash thrive when planted three feet apart. This makes squash a great contender for interplanting.
What works well for me is to interplant squash with tall plants. Then they are not competing for space.
Also, I favor herbs or flowers that aren’t heavy feeders so that the squash can thrive.
As in the Indigenous Three Sisters companion planting, the leaves of the squash provide a living mulch for the soil. This protects other plants from heat and water evaporation.
I have had great success interplanting the following plants with winter squash:
chamomile
tulsi
basil
calendula
strawflower
purple sprouting broccoli (this works well since this broccoli doesn’t produce florets until the following spring. This means the two plants don’t compete too much)
onions
leeks
amaranth
garlic (this works well for winter-sown garlic, as the squash would be planted out a month or two before the garlic was harvested)
beets
radishes
Interplant squash with other non-curcubit vegetables or an assortment of herbs and flowers. The more diversity in your garden, the more biodiversity you build in the soil microbiome.
Herbs and flowers also bring in beneficial insects. These garden helpers support your plants as they eat pests.
Indigenous Three (and Four) Sisters Planting
Melissa Kruse-Peeples, the Educational Coordinator for Native Seeds Search, describes this important indigenous system. She explains that the Three Sisters plantings of corn, beans, and squash, began with the Haudenosaunee peoples. They are located in the Northeastern United States, surrounding the Great Lakes.
The Three Sisters is the most popular, and oldest, example of companion planting.
The corn grows tall and acts as a trellis for the beans. Beans are natural nitrogen fixers, so they add nutrients to the soil for the other crops. The squash sprawls across the soil to provide shade and prevent water evaporation.
The Three Sisters method of planting can be seen in other regions, too. The Hopi and Najavo Nation also planted these crops together.
Melissa explains that in dry areas, corn, beans and squash are planted separately to maximize the water absorption of the soil. However, the three crops are rotated in the field each year. The practice of crop rotation is another regenerative gardening method that originated with indigenous peoples.
Blue Hubbard “Trap Crop” for Squash Bugs
Usually a companion plant isn’t in the same species. And Blue Hubbard Squash is a delicious winter squash in its own right!
One method against spotted cucumber beetles, striped cucumber beetles, squash bugs and squash vine borers is outlined by the University of Missouri. These bugs prefer Blue Hubbard Squash, UoM deterred the pests away from their “cash crop” with the Hubbards.
The technique involves starting the Blue Hubbard Squash before your desired crop. Then, place the tray of the young Blue Hubbard seedlings outside, in the location where you will plant them. When you see squash bugs on the seedlings, it is time to transplant them around the perimeter of your plot.
It’s recommended to then direct sow your main squash or cucumber crop. The Blue Hubbard plants will continue to attract the bugs and you can control them in those specific spots with handpicking.
They recommend 8 Blue Hubbard Squash plants for every 100 of your desired squash plants (source).
Amaranth
In my garden I interplanted amaranth and purple sprouting broccoli with with winter squash and had great results!
Amaranth is a gorgeous plant that adds height and texture to your garden. Plus, the grains are easy to harvest and make for a delicious protein-rich side dish.
Amaranth is a great companion plant for winter squash because it attracts ground beetles, according to Mother Earth News. Ground Beetles are a predator for squash vine borers and other garden pests.
In regenerative gardening, mulch is an essential component for soil health.
Mulch adds organic matter to the soil. It also prevents soil erosion, and helps maintain soil moisture.
When mulch covers the soil, the soil microbial community is able to thrive. This is because the soil won’t get dried out and the mulch provides food for microbes to eat.
Common materials for mulch are grass clippings and organic straw.
Add compost to winter squash
Add compost to your garden to increase soil organic matter levels. Compost also balances out the structure of both clay and sandy soils.
Compost supports your garden and the environment. According to the EPA, compost adds biodiversity to the soil microbiome. With improved water holding capacity, compost reduces water needs for your crops.
The EPA notes that compost can reduce the need for chemical inputs, such as fertilizers and pesticides.
Compost does all of that while also increasing plant vigor and harvests.
Mulch and drip irrigation are two ways to conserve water in your regenerative garden.
Drip irrigation is another important way to save water in your garden. In fact, UMass Amherst found that you use around 80% less water when you have drip irrigation correctly in place.
Moreover, drip irrigation will help prevent wet leaves on your plants. This will reduce the amount of powdery mildew damage on your crops.
Organic practices
Regenerative gardening focuses on healthy soil, healthy food, and a healthy planet.
This means no synthetic pesticides or herbicides.
Synthetic inputs create soil that is void of the normal microbe-plant relationships. These chemicals are also made from petroleum products. Overall, synthetic inputs add greenhouse gases into the environment.
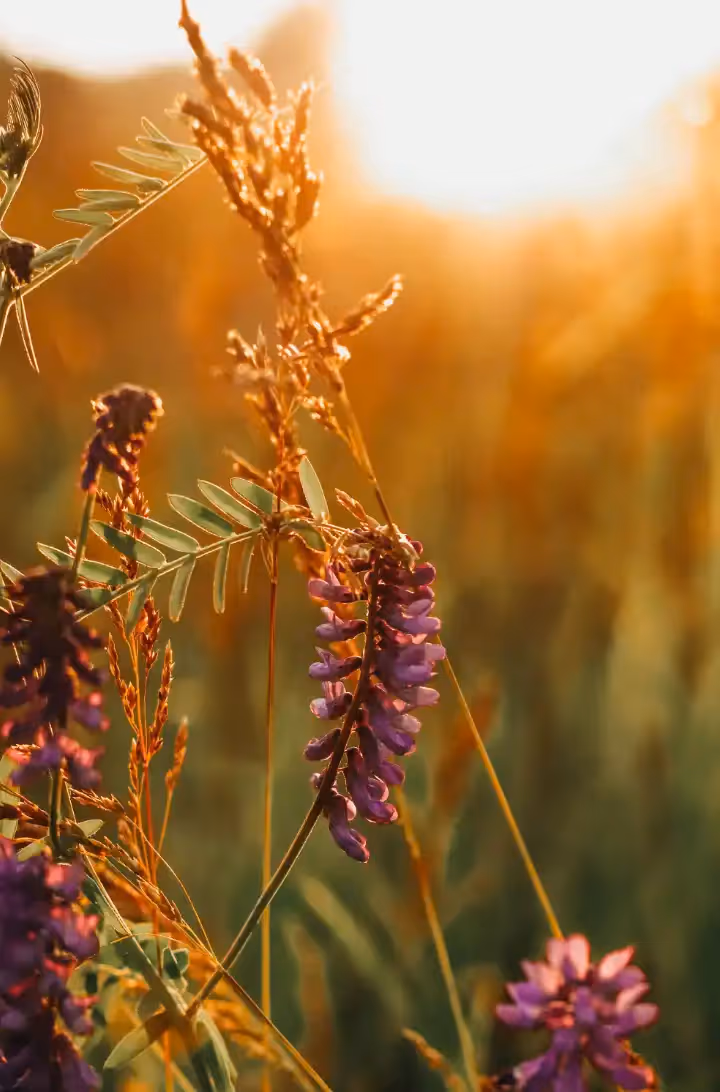
Cover Cropping After Growing Winter Squash:
Your winter squash will be harvested before your first frost. After harvest, aim to plant a cover crop.
Regenerative gardening focuses on carbon sequestration in the garden. You can do this with a cover crop, which will continue the carbon storage process in your backyard over winter.
Look for varieties of cover crop that do well when sown in cooler weather.
Daikon radish can be a great choice if you noticed that your soil was compacted. Hairy vetch is a fantastic winter-sown cover crop as well that adds nitrogen to the soil. You can also plant a mix of daikon with hairy vetch to get the best of both worlds.
Common winter squash problems
Avoid overwatering or waterlogged conditions that can lead to rot. Practice crop rotation and maintain good garden hygiene to prevent disease recurrence.
Heavy rainfall or extreme temperatures may also affect squash growth.
To manage pests and diseases in winter squash, it's important to be proactive.
Common pests include cucumber beetles, squash vine borers, and squash bugs.
Be observant of your plants and pick off any pests or eggs that you see.
Of course, crop rotation is another effective way to reduce the incidence of pests and disease in your garden.
Be sure to never water your squash plants overhead, which will also help reduce incidence of disease.
If you have had powdery mildew the past, try to grow a pm-resistant varieties. Honeynut butternut squash is noted for being powdery mildew resistant.
Squash: Something for Everyone
There is such a wide variety of winter squash out there - from sweet to nutty, small to extra large, there's something for almost any purpose and taste preference. Plus, with a range of colors from deep green to yellow to pink, winter squash add visual interest to your garden. I hope you'll have a go at growing this pantry staple to enjoy some homegrown food throughout the winter months.